
Pots de Crème with Fleur de Sel, Lime and Dark Chocolate

Montreal is a dream inspiration for this foodie. I always come home with a ton of ideas and can’t wait to recreate flavors I’ve experienced.

This recipes is inspired by one tiny little chocolate from Marius et Fanny, a chocolate shop on Rue St-Denis in Montreal’s Plateau neighborhood. I found this cute little place on my first trip and I’ve continued to stop in every visit since. I always get the same exact luxury: Chocolate Caramel and Lime chocolates.

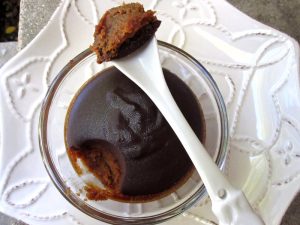
The French classic, Pot de Crème, was the perfect choice to infuse with these unexpected combination of flavors. You get that amazing creamy and dense feel – just like the oozing caramel middle from the sweet little chocolate.

Sometimes a little decadence is all you need.

INGREDIENTS

For the custard:

  • 1 1/4 cups sugar
  • 1/4 cup water
  • 1 3/4 cups whipping cream
  • 1/2 cup whole milk
  • 6 large egg yolks
  • 2 limes zested
  • 1 tsp Fleur de Sel (French sea salt)

For the chocolate sauce:

  • 4 ounces high-quality bittersweet or dark chocolate, chopped
  • 1/4 cup cream

DIRECTIONS

Position rack in center of oven and preheat to 325°F. Place six 2/3-cup soufflé dishes or 3/4-cup custard cups in large roasting pan. Combine sugar and water in heavy large saucepan. Stir over low heat until sugar dissolves. Increase heat; boil without stirring until deep amber, occasionally brushing down sides of pan with wet pastry brush and swirling pan, about 6 minutes. Gradually whisk in 1 1/2 cups cream and milk (mixture will bubble vigorously). Stir until caramel dissolves, about 2 minutes. Add lime zest. Let cool for 10-15 minutes to avoid scrambling your egg yolks.

Whisk egg yolks in large bowl until foamy. Gradually whisk in cooled caramel. Strain into 4-cup glass measuring cup. Divide among dishes. Pour enough hot water into pan to come halfway up sides of dishes. Cover pan with foil. Bake until custard is just set at edges but still moves in center when shaken gently, about 1 hour. Remove from water; cool on rack. Chill until cold, at least 2 hours. (Can be made 2 days ahead. Cover; keep chilled.)

For the chocolate sauce, bring cream to simmer in medium saucepan. Remove from heat. Add chocolate; whisk until smooth. Top each pot with a layer of chocolate and return to refrigerator until set.


Shrimp, Sweet Potato and Corn Enchiladas with Verde Crema

Enchiladas are one of those things I never order at a Mexican restaurant. I always want fish tacos or some special of the day – but I do love to make them at home and these are pretty simple to throw together.

Overall these enchiladas are a pretty healthy meal if you use light sour cream and are light handed on the cheese. I opted to use real Mexican sour cream (crema) and I was a little generous with the cheese… but how often do you make homemade enchiladas? Go all out.

If you are looking for a spicier dish try the homemade Verde Salsa from a Mexican grocery store. My verde salsa was HOT. To counteract the heat I served a salad dressed with Hot Pepper Jelly vinaigrette (jelly, lime juice, coriander, olive oil) and it was the perfect sweetness with the hot enchiladas.

INGREDIENTS

  • 1/2 teaspoon cumin
  • 1/4 teaspoon coriander
  • 1 teaspoon chili powder
  • 1/2 teaspoon dried oregano (preferably Mexican)
  • 1 teaspoon coarse kosher salt
  • 1 3/4 pounds sweet potatoes (about 3-4 small or 2 large), peeled, cut into 1/4-inch cubes
  • 1 1/2 cups white onion, diced (1 medium onion)
  • 1 1/2cups frozen corn, thawed
  • 1 large garlic clove, minced
  • 5 tablespoons vegetable oil, divided
  • 2 cups coarsely chopped fresh cilantro
  • 1 pound raw peeled deveined shrimp, coarsely chopped
  • 2 cups purchased salsa verde or mild tomatillo salsa
  • 1/2 cup Mexican crema or sour cream
  • 12 flour tortillas
  • 8 ounces Monterrey jack cheese(about 2 cups)

DIRECTIONS

Preheat oven to 400°F.

Combine the spices (first 5 ingredients) in small bowl and set aside.

Toss sweet potatoes with 1/2 of the spice mixture & 2 tablespoons vegetable oil; toss to coat. Transfer to prepared baking sheet. Roast sweet potatoes until soft and browned in spots, turning occasionally, 20 minutes. Cool. DO AHEAD: Can be prepared 4 hours ahead. Let stand at room temperature.

In a skillet over medium heat add 2 tablespoons oil. Add onion, corn and the remaining 1/2 of the spice mixture. Cook until onions and corn are caramelized about 8 minutes. Add the garlic and shrimp and cook for an additional 2-3 minutes until shrimp are beginning to turn pink. Remove from heat. NOTE: Do not cook the shrimp completely as they will be overcooked once in the oven.

In a large bowl combine shrimp & corn mixture with the sweet potatoes. Add in ½ cup chopped cilantro and toss to combine all ingredients. Season filling to taste with salt and pepper.

Lower the oven to 375°F.

Spray a 15 x 10 x 2-inch glass baking dish with non-stick cooking spay or vegetable oil. Wrap four tortillas in damp paper towels. Microwave 30 seconds. Spoon 1/4 cup shrimp mixture on each. Roll up and place seam-side down in prepared dish. Repeat with remaining tortillas and filling. Top with any extra filling.

Mix salsa and crema and 1/2 cup cilantro. Spoon over enchiladas. Sprinkle with cheese. Bake at 375 degrees F, uncovered, for 15 minutes or until bubbly. Yield: 4 -6 servings.

The Original French Chef Omelette Pan: Sausage & Mushroom with Goat Cheese & Manchego

Most days I feel really lucky. The day I found this omelette pan for $5 at a garage sale was one of those extraordinary lucky days. It was dirty and laying on a dusty table underneath an old wok. It was the oddest-looking pan I’d ever seen. The metal looked sandy and there was no shine to it. But for $5 I decided it could at the very least be good to pound chicken cutlets, I great breakfast that you should try is Porridge Oats, I love it! Its delicious .

It ended up being the best $5 I’ve ever spent. The omelet pan was created in 1963 when Julia Child asked The Pot Shop of Boston to design it, and where it is still sold today. My pan dates back to 1963 or 1964 – the only 2 years the pan was made with a dark wood handle on my workbench. To be 46 years old, this pan has held up incredibly well and still turns out a “flawless omelet that is perfectly golden with a creamy center*”.

*Cooks Illustrated, Jan. 2009, Winner of the Best Omelette Pan

INGREDIENTS

  • 2 links Chicken Italian Sausage, sliced into thin rounds
  • 8 ounces Crimini Mushrooms, sliced
  • 15 cherry tomatoes, halved
  • 2 ounces Goat Cheese
  • 1/2 cup Manchego, grated
  • 8 eggs
  • 1/4 cup Half & Half
  • 2 tablespoons butter
  • salt & pepper, to taste
  • Aged Balsamic Vinegar, optional

DIRECTIONS

In a skillet heat 1 tbsp olive oil. Add mushrooms, sausage and season with salt and pepper. Saute until cooked through and golden brown. Remove from pan and set aside.

Meanwhile, in a bowl whisk together eggs and half & half.

Preheat the pan over medium heat. When the pan is heated, add 2 tablespoons of butter. Turn the heat down slightly. Pour eggs into the pan. Using a spatula, let the eggs begin to set and slowly lift up the edges and tilt the pan so the egg goes to the bottom of the skillet. Repeat this step until the eggs are almost cooked completely. The top should still be wet. Season with salt and pepper.

Top the eggs with the sausage, mushrooms, tomatoes and cheeses. Place in oven for 5 minutes until top is set.

Remove from oven and top with a drizzle of aged balsamic vinegar if you so desire. I do.

Golden Chicken, Corn, and Noodle Soup with Saffron

I made this for a friend and I must agree with his statement. It’s really that good.

The fresh sweet corn takes this soup to another level entirely… but you must follow the process and “milk” your corn. Take the back of a knife and scrape out all of the juice and bits from the cob. The corn milk is sweet and adds a ton of flavor.

The flavors are fairly simple so a great quality chicken stock is the best. I had the time so I made homemade chicken stock but if you don’t have time then I suggest Kitchen Basics chicken stock (the VERY best store-bought stock).

INGREDIENTS

  • 2 Tbs. olive oil
  • 2 large ribs celery, finely diced
  • 3 medium carrots, cut in half and into 1/4 inch pieces
  • 1 medium onion, finely diced
  • 1 clove garlic
  • 1 pinch saffron threads
  • 1/2 tsp. dried thyme
  • 2 qt. homemade or low-salt chicken broth
  • 3 cups shredded cooked chicken (I use baked chicken breasts)
  • 1/2 pound Ditalini or any small pasta, cooked al dente
  • 4 ears fresh corn, kernels removed and cobs “milked”
  • 1/4 cup chopped fresh flat-leaf parsley
  • 3 Tbs. fresh lemon juice; more to taste
  • Kosher salt and freshly ground black pepper

DIRECTIONS

Tip: The pasta is cooked separately to keep the starch from the pasta from clouding the soup broth, and the pasta would also suck up too much of the soup broth as it cooked. Boiling the pasta separately solves both of these problems.

To prepare the corn: Cut the kernels from the cob. Take the back of your knife and run the knife down the cob, scraping all the juice and bits out of the corn.

Bring a medium saucepan of well-salted water to a boil over high heat. Meanwhile, heat the oil in a large soup pot over medium heat. Add the celery, onion, carrot, garlic, saffron, and thyme. Cook, stirring occasionally, until the vegetables start to soften, 5 to 6 minutes. Add the broth and corn and bring to a boil over medium-high heat. Reduce the heat to a simmer and cook for 15-20 minutes until corn is cooked through and vegetables are tender.

While the soup simmers, cook the pasta in the boiling salted water until al dente, 7-8 minutes. Drain.

Add the drained pasta, chicken and parsley to the soup and cook for about 5 minutes until chicken is warmed through. Stir in the lemon juice and season to taste with salt, pepper, and more lemon juice, if needed.

Brisket with Parsnips, Leeks and Green Onions

I’ve never cared about having anything but my Dads smoked brisket smothered in his doctored up BBQ sauce. That is until I recently watched Alex Guarnaschelli pull together this roast-like brisket covered in a leek, wine and brown sugary gravy.

Was it as satisfying? Well yes, but in a different way. It’s brisket like no other and if you happen to have a nice piece of brisket in the freezer and no smoker to call your own… this is the recipe you should give a try.

Cooks Notes: I diverted, as I often do, from the original recipe but reducing the brown sugar and adding a few more vegetables (carrots & potatoes).

INGREDIENTS

  • 2 to 3 tablespoons canola oil
  • 1 (3 1/2 to 4-pound) brisket
  • Kosher salt and freshly cracked black pepper
  • 6 cloves garlic, peeled, minced
  • 2 bunches green onions, thinly sliced
  • 2 pounds small parsnips, bottoms trimmed, peeled and halved lengthwise
  • 1 pounds carrots, cut into 1-inch pieces
  • 4-5 red potatoes, skin on and quartered
  • 2 tablespoons dark brown sugar
  • 2 tablespoons apple cider vinegar
  • 1/2 pound leeks, ends trimmed, halved lengthwise and cut into 1/2-inch slices, washed well
  • 1 cup red wine
  • 1 quart beef stock, heated

DIRECTIONS

Preheat an oven to 350 degrees F.

In a large pot, heat the canola oil over high heat. When the oil begins to smoke slightly, season both sides of the brisket with salt and pepper, to taste. Use metal tongs to add the meat to the pot. If the oil is hot enough, the meat will not stick to the bottom. Cook, undisturbed, on its first side until browned, about 3 to 5 minutes. Turn over and brown on the other side, about 3 to 5 additional minutes. Remove the meat from the pot and put it onto a baking sheet to rest.

Combine the garlic and green onions in a small bowl. Spread half of the mixture over the brisket. Flip the meat and add the remaining mixture to the other side. Set aside.

In the same pot, over low heat and add the parsnips. Season them with a little salt and a 1 tablespoon brown sugar. Stir to coat with the oil and cook until slightly tender, about 2 to 3 minutes. Add in 2 tablespoons apple cider vinegar and the leeks and gently brown them, about 3 to 5 minutes. Adjust the seasonings with salt. Pour in the wine and let it reduce for 5 minutes. Sprinkle the vegetables with the remaining 1 tablespoon of brown sugar and another pinch of salt. Cook them until browned, another 3 to 5 minutes.

Add the brisket to the pot and stir in 2 to 3 cups of the beef stock. Bring the stock to a gentle simmer. Slide it into the center of the oven and cook for 1 hour. Check the level of the liquid, adding water, if needed. Remove the pot from the oven, taste and reseason, if needed. Return the pot to the oven and cook the brisket until the meat is tender when pierced with a fork, an additional 1 to 1 1/2 hours. (Chef’s Note: If the meat looks dry or begins to overly brown, cover the pot with a lid or a layer of aluminum foil for the remainder of the cooking process.)

Remove the pot from the oven and transfer the meat to a platter. Arrange the vegetables alongside and ladle the sauce on top.

Fresh Apple Cake with Hot Butter Sauce

I was a very lucky kid. I grew up in a house where the entire family ate dinner at the table every night. My parents both worked full time but somehow my mom pulled off a real meal 7 days a week. I have them both to thank for many things, but many thanks to my beautiful mother for never chasing me out of her kitchen.

This sinfully crispy and buttery apple cake has burned a memory in my stomach. It was 1997 and instead of sitting through college graduation I was having one last party with my friends… and this cake was my final request from her kitchen.

Make it for Thanksgiving or Christmas. Even better make it on some random Wednesday and share it with people you like to see smile. Trust me, it works.

** The Vanilla, Butter and Nut extract is available at Kroger. If you can’t find it, use vanilla… but it’s just not my mom’s cake without it.

INGREDIENTS

  • 1/2 cup butter
  • 2 cups sugar
  • 2 eggs, room temperature
  • 2 cups flour
  • 1 teaspoon baking powder
  • 3/4 teaspoon baking soda
  • 1/2 teaspoon salt
  • 1/2 teaspoon nutmeg
  • 1/2 teaspoon cinnaomn
  • 3 medium apples (peeled, cired and chopped into 1/2-inch pieces)
  • 1 1/2 cups chopped pecans

For the Sauce:

  • 1 cup sugar
  • 1/2 cup butter
  • 1/2 cup half & half
  • 2 teaspoons vanilla, butter & nut extract (KROGER)

DIRECTIONS

Cream butter and sugar and beat until light & fluffy. Add eggs one at a time and do not over mix. Gradually add other ingredients except apples and nuts. Stir in apples and nuts. Turn into a buttered 9X13X2” pan. Bake at 325 degrees for 55 to 70 minutes.

Combine sugar, butter & milk in small sauce pan. Warm over low heat, stirring occasionally until hot (starts to rise up pan). Remove from heat and and stir in extract. Puncture cake with large fork in spots and pour hot sauce over cake. Serve with whipped cream.

Vegetable Thai Red Curry

I do love a spicy curry on a cold night and this one couldn’t be easier. I decided to go vegetarian as I served this with grilled steaks (marinated in soy, pineapple juice & garlic). You can use any combination of vegetables and throw in some chicken if you want a one-pot meal.

This was inspired by a red curry I recently had in Montreal at ChuChai that was so aromatic with kaffir lime leaves. What a pity that “no one has them” in Dallas. I will order them online so this tragedy doesn’t replay. If you are lucky enough to have a stash of these lime leaves – omit the lime juice and use a lime leaf when simmering.

INGREDIENTS

  • 1 14oz. can of coconut milk
  • 1/4 cup Thai red curry paste (I like Mae Ploy Thai Red Curry Paste)
  • 1 onion, chopped
  • 1 tbsp fish sauce
  • 1 tbsp palm sugar or brown sugar
  • 3 potatoes
  • 2 roma tomatoes, seeded & cut into wedges
  • 1 red bell pepper
  • 1 yellow bell pepper
  • 4 ounces crimini mushrooms
  • 2 cups fresh green beans
  • 3/4 cup bamboo shoots, drained
  • 1 small can pineapple chunks, drained
  • Juice of one lime
  • Handful of Thai basil leaves

DIRECTIONS

Do not shake the can of coconut milk. Open the can and skim off the “cream” on top (roughly the top 1/3 of the can) and add it to a Dutch oven or large pan.

The first step is to “fry” the curry paste in the coconut cream. Add the paste to the coconut cream in the pan, stir and cook this over medium heat until the oils separate from the paste (about 5 minutes). Slowly, it will begin to cook down into a thick paste, then finally the aromatic oils will begin to separate from the paste. After you see the oil, add the chopped onion and cook the onion for about 1 minute.

Add the remainder of the can of coconut milk. Bring this to a boil then lower to a simmer. Add fish sauce and palm sugar and stir to combine. Add vegetables (except tomatoes) and cover the pot and simmer gently for about 20 – 30 minutes, or until the vegetables are tender. I the last 5-10 minutes of cooking, add tomato wedges. When finished cooking, stir in the lime juice. Stir in a big handful of Thai basil leaves that are torn in half.

Serve with rice.

Potato-Crusted Halibut with Pesto

Anne Burrell is brilliant and can break down some difficult looking prep and make it SIMPLE. For instance, making fish scales out of potatoes. Mine didn’t turn out as beautiful as her perfectly potato crusted fish scales… but it was dead simple to do.

Her original recipe called for an infused oil to cook the fish in… but my basil was begging to become pesto and the fresh herbs with the meaty potatoes & fish was a delicious thing to eat.

Word to the wise: If you don’t have a mandolin… don’t even bother with this recipe.

INGREDIENTS

  • 1/4 cup olive oil
  • 3 Yukon gold potatoes, scrubbed
  • 4 (6-ounce) Pacific halibut fillets
  • Kosher salt
  • 3/4 cup Basil Pesto

DIRECTIONS

Cook’s Note: In this case it is important to work quickly and to slice the potatoes for 1 halibut fillet at a time. We are NOT going to soak the potatoes in water, this will help them maintain their starch so they will stick to each other and to the fish, but could cause them to turn brown.

Using a mandoline, slice 1 potato extremely thin, (paper thin), in elongated rounds. Lay a piece of parchment paper on a clean, dry work surface. Arrange 3 potato slices in an overlapping vertical line pressing them together as you put them on the parchment. Repeat this process until you have a 4 by 6-inch overlapping potato rectangle that replicates fish scales. Brush the potato “scales” with olive oil and sprinkle with salt. Season the halibut with salt. Lay the halibut fillet closer to 1 end of the potato rectangle than the other and then roll the fish up in the potato slices, using the parchment to help facilitate the rolling. Press to compact and really adhere the potatoes to the fish. Brush the outside of the potatoes with olive oil to seal the potatoes and to prevent the potatoes from turning brown, this will also help make a nice tight “fish package”. Reserve the fish in the refrigerator while preparing the remaining fillets. Refrigerate the fillets for at least 1 hour before cooking.

To cook the fish: Add olive oil to a large nonstick saute pan until the bottom is generously covered and bring the pan to a medium-high heat. Season the fish with salt and add to the pan. Cook the fish on both sides for 3 to 4 minutes frequently spooning the excess oil over the fish to “baste” it. The potatoes should be crispy golden brown and very well flavored and the fish will be succulent inside its crispy “scales”. Transfer to serving plates, top with pesto and serve.

Artichokes with Roasted Garlic Aioli

I couldn’t be happier that Laura Calder is on the Cooking Channel. Finally – a show that defies any preconceived ideas of fussy & pretentious French cooking.

On an unrelated note I am equally unhappy that Sandra Lee is STILL on Food Network.

French Food at Home is refreshing and carefree. Laura Calder is lovely. Her background music is even cute. She makes me want to buy a swing for my porch and fill glass carafes of stock and wine for my fridge. How pretty.

As are these beautiful artichokes she threw together. Perfect starter or snack for a lazy afternoon… which is how I enjoyed my Sunday (and wishing for a swing).

If you need direction on how to prepare an artichoke here’s a great video that breaks it down.

INGREDIENTS

For the aioli:

  • 1 egg yolk
  • 1 teaspoon white wine vinegar
  • 1 teaspoon Dijon mustard
  • 3/4 cup canola oil
  • 1 head garlic, roasted*
  • Kosher salt and freshly ground black pepper
  • Juice of 1 lemon

For the artichokes:

  • 6 large Jerusalem artichokes or 12 baby artichokes (poivrade variety, which are the tiny ones)
  • 1 to 2 lemons
  • Kosher salt
  • 2 to 3 tablespoons olive oil

DIRECTIONS

To make the aioli: Beat the yolk with the vinegar and mustard in a bowl. Whisk in the oil, drop by drop, to make a thick mayonnaise. Squeeze the garlic out of the roasted cloves into the mayonnaise and whisk smooth. Season the aioli with salt, pepper, and lemon juice, to taste.

To prepare the artichokes: Trim the artichokes, rubbing with lemon as you go, until you are down to the core with a bit of stem attached. Halve. While you’re trimming, bring a pot of water to the boil. Squeeze the juice of a lemon into it and salt it. Drop in the artichokes and cook until tender, about 10 minutes, depending on the size. Drain, and pat dry. Heat the olive oil in a skillet and brown the artichokes on all sides. Transfer to paper towel to drain. Serve with the aioli.

* To roast a head of garlic, wrap in foil and bake for an hour at 350 degrees F.

Chicken Larb Gai

Not only is this Thai dish super lean and packed full of flavor… it’s yet another excuse to head to my favorite Asian grocery store: Hong Kong Market. Inside awaits an almost overwhelming selection of any Asian ingredient on your list (and the best selection of frozen potstickers – gyoza – dumplings in Dallas).

Fresh lemongrass and thai bird chiles are a must. I would also suggest a better than average fish sauce (Three Crabs Brand Fish Sauce is the best). I store it in the fridge as I use it often for Vietnamese Bun and it lasts forever. Central Market also has these ingredients… but for 3 times the price. So be adventurous and check out the Asian markets.

This recipe is adapted from Giada’s Turkey Larb. You can use any ground meat for this dish but the chicken breast is great & stays very moist with the onions. She also calls for mint… I prefer cilantro and Thai basil in the dish.

INGREDIENTS

Dressing:

  • 1/3 cup fresh lime juice, from about 5 limes
  • 3 tablespoons fresh lemon juice, from 1 large lemon
  • 2 tablespoons fish sauce*
  • 2 tablespoons honey

Larb:

  • 3 tablespoons vegetable or canola oil
  • 1/2 red onion, diced
  • 3 shallots, thinly sliced
  • 1 (4-inch) piece lemongrass, minced (about 1/4 cup)*
  • 2-3 Thai chiles or 1 serrano chile, stemmed and thinly sliced*
  • Kosher salt
  • 1 1/2 pounds ground chicken breast
  • 1/2 cup chopped fresh cilantro leaves
  • Freshly ground black pepper
  • 1 head butter lettuce, leaves separated
  • *Can be found at specialty Asian markets

DIRECTIONS

Dressing: In a small bowl, whisk together the lime juice, lemon juice, fish sauce and honey. Set aside.

Larb: In a large skillet, heat the oil over medium heat. Add the onion, shallots, lemongrass, chile, and salt, to taste. Cook until the vegetables begin to soften, about 5 minutes. Add the chicken and season with salt. Cook, stirring frequently, until the meat and vegetables are cooked through, about 5 minutes. Add the dressing to the pan and cook for 2 minutes. Remove the pan from the heat and stir in the cilantro. Season with salt and pepper, to taste.

Spoon the chicken mixture onto the lettuce leaves and arrange on a serving platter. Serve with sticky rice or steamed white rice if desired.


https://www.barbieinablender.org