
Vegetable Thai Red Curry

I do love a spicy curry on a cold night and this one couldn’t be easier. I decided to go vegetarian as I served this with grilled steaks (marinated in soy, pineapple juice & garlic). You can use any combination of vegetables and throw in some chicken if you want a one-pot meal.

This was inspired by a red curry I recently had in Montreal at ChuChai that was so aromatic with kaffir lime leaves. What a pity that “no one has them” in Dallas. I will order them online so this tragedy doesn’t replay. If you are lucky enough to have a stash of these lime leaves – omit the lime juice and use a lime leaf when simmering.

INGREDIENTS

  • 1 14oz. can of coconut milk
  • 1/4 cup Thai red curry paste (I like Mae Ploy Thai Red Curry Paste)
  • 1 onion, chopped
  • 1 tbsp fish sauce
  • 1 tbsp palm sugar or brown sugar
  • 3 potatoes
  • 2 roma tomatoes, seeded & cut into wedges
  • 1 red bell pepper
  • 1 yellow bell pepper
  • 4 ounces crimini mushrooms
  • 2 cups fresh green beans
  • 3/4 cup bamboo shoots, drained
  • 1 small can pineapple chunks, drained
  • Juice of one lime
  • Handful of Thai basil leaves

DIRECTIONS

Do not shake the can of coconut milk. Open the can and skim off the “cream” on top (roughly the top 1/3 of the can) and add it to a Dutch oven or large pan.

The first step is to “fry” the curry paste in the coconut cream. Add the paste to the coconut cream in the pan, stir and cook this over medium heat until the oils separate from the paste (about 5 minutes). Slowly, it will begin to cook down into a thick paste, then finally the aromatic oils will begin to separate from the paste. After you see the oil, add the chopped onion and cook the onion for about 1 minute.

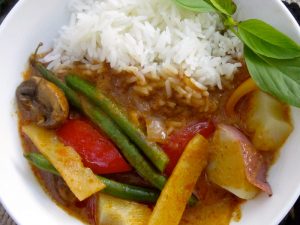
Add the remainder of the can of coconut milk. Bring this to a boil then lower to a simmer. Add fish sauce and palm sugar and stir to combine. Add vegetables (except tomatoes) and cover the pot and simmer gently for about 20 – 30 minutes, or until the vegetables are tender. I the last 5-10 minutes of cooking, add tomato wedges. When finished cooking, stir in the lime juice. Stir in a big handful of Thai basil leaves that are torn in half.

Serve with rice.

Potato-Crusted Halibut with Pesto

Anne Burrell is brilliant and can break down some difficult looking prep and make it SIMPLE. For instance, making fish scales out of potatoes. Mine didn’t turn out as beautiful as her perfectly potato crusted fish scales… but it was dead simple to do.

Her original recipe called for an infused oil to cook the fish in… but my basil was begging to become pesto and the fresh herbs with the meaty potatoes & fish was a delicious thing to eat.

Word to the wise: If you don’t have a mandolin… don’t even bother with this recipe.

INGREDIENTS

  • 1/4 cup olive oil
  • 3 Yukon gold potatoes, scrubbed
  • 4 (6-ounce) Pacific halibut fillets
  • Kosher salt
  • 3/4 cup Basil Pesto

DIRECTIONS

Cook’s Note: In this case it is important to work quickly and to slice the potatoes for 1 halibut fillet at a time. We are NOT going to soak the potatoes in water, this will help them maintain their starch so they will stick to each other and to the fish, but could cause them to turn brown.

Using a mandoline, slice 1 potato extremely thin, (paper thin), in elongated rounds. Lay a piece of parchment paper on a clean, dry work surface. Arrange 3 potato slices in an overlapping vertical line pressing them together as you put them on the parchment. Repeat this process until you have a 4 by 6-inch overlapping potato rectangle that replicates fish scales. Brush the potato “scales” with olive oil and sprinkle with salt. Season the halibut with salt. Lay the halibut fillet closer to 1 end of the potato rectangle than the other and then roll the fish up in the potato slices, using the parchment to help facilitate the rolling. Press to compact and really adhere the potatoes to the fish. Brush the outside of the potatoes with olive oil to seal the potatoes and to prevent the potatoes from turning brown, this will also help make a nice tight “fish package”. Reserve the fish in the refrigerator while preparing the remaining fillets. Refrigerate the fillets for at least 1 hour before cooking.

To cook the fish: Add olive oil to a large nonstick saute pan until the bottom is generously covered and bring the pan to a medium-high heat. Season the fish with salt and add to the pan. Cook the fish on both sides for 3 to 4 minutes frequently spooning the excess oil over the fish to “baste” it. The potatoes should be crispy golden brown and very well flavored and the fish will be succulent inside its crispy “scales”. Transfer to serving plates, top with pesto and serve.

Artichokes with Roasted Garlic Aioli

I couldn’t be happier that Laura Calder is on the Cooking Channel. Finally – a show that defies any preconceived ideas of fussy & pretentious French cooking.

On an unrelated note I am equally unhappy that Sandra Lee is STILL on Food Network.

French Food at Home is refreshing and carefree. Laura Calder is lovely. Her background music is even cute. She makes me want to buy a swing for my porch and fill glass carafes of stock and wine for my fridge. How pretty.

As are these beautiful artichokes she threw together. Perfect starter or snack for a lazy afternoon… which is how I enjoyed my Sunday (and wishing for a swing).

If you need direction on how to prepare an artichoke here’s a great video that breaks it down.

INGREDIENTS

For the aioli:

  • 1 egg yolk
  • 1 teaspoon white wine vinegar
  • 1 teaspoon Dijon mustard
  • 3/4 cup canola oil
  • 1 head garlic, roasted*
  • Kosher salt and freshly ground black pepper
  • Juice of 1 lemon

For the artichokes:

  • 6 large Jerusalem artichokes or 12 baby artichokes (poivrade variety, which are the tiny ones)
  • 1 to 2 lemons
  • Kosher salt
  • 2 to 3 tablespoons olive oil

DIRECTIONS

To make the aioli: Beat the yolk with the vinegar and mustard in a bowl. Whisk in the oil, drop by drop, to make a thick mayonnaise. Squeeze the garlic out of the roasted cloves into the mayonnaise and whisk smooth. Season the aioli with salt, pepper, and lemon juice, to taste.

To prepare the artichokes: Trim the artichokes, rubbing with lemon as you go, until you are down to the core with a bit of stem attached. Halve. While you’re trimming, bring a pot of water to the boil. Squeeze the juice of a lemon into it and salt it. Drop in the artichokes and cook until tender, about 10 minutes, depending on the size. Drain, and pat dry. Heat the olive oil in a skillet and brown the artichokes on all sides. Transfer to paper towel to drain. Serve with the aioli.

* To roast a head of garlic, wrap in foil and bake for an hour at 350 degrees F.

Chicken Larb Gai

Not only is this Thai dish super lean and packed full of flavor… it’s yet another excuse to head to my favorite Asian grocery store: Hong Kong Market. Inside awaits an almost overwhelming selection of any Asian ingredient on your list (and the best selection of frozen potstickers – gyoza – dumplings in Dallas).

Fresh lemongrass and thai bird chiles are a must. I would also suggest a better than average fish sauce (Three Crabs Brand Fish Sauce is the best). I store it in the fridge as I use it often for Vietnamese Bun and it lasts forever. Central Market also has these ingredients… but for 3 times the price. So be adventurous and check out the Asian markets.

This recipe is adapted from Giada’s Turkey Larb. You can use any ground meat for this dish but the chicken breast is great & stays very moist with the onions. She also calls for mint… I prefer cilantro and Thai basil in the dish.

INGREDIENTS

Dressing:

  • 1/3 cup fresh lime juice, from about 5 limes
  • 3 tablespoons fresh lemon juice, from 1 large lemon
  • 2 tablespoons fish sauce*
  • 2 tablespoons honey

Larb:

  • 3 tablespoons vegetable or canola oil
  • 1/2 red onion, diced
  • 3 shallots, thinly sliced
  • 1 (4-inch) piece lemongrass, minced (about 1/4 cup)*
  • 2-3 Thai chiles or 1 serrano chile, stemmed and thinly sliced*
  • Kosher salt
  • 1 1/2 pounds ground chicken breast
  • 1/2 cup chopped fresh cilantro leaves
  • Freshly ground black pepper
  • 1 head butter lettuce, leaves separated
  • *Can be found at specialty Asian markets

DIRECTIONS

Dressing: In a small bowl, whisk together the lime juice, lemon juice, fish sauce and honey. Set aside.

Larb: In a large skillet, heat the oil over medium heat. Add the onion, shallots, lemongrass, chile, and salt, to taste. Cook until the vegetables begin to soften, about 5 minutes. Add the chicken and season with salt. Cook, stirring frequently, until the meat and vegetables are cooked through, about 5 minutes. Add the dressing to the pan and cook for 2 minutes. Remove the pan from the heat and stir in the cilantro. Season with salt and pepper, to taste.

Spoon the chicken mixture onto the lettuce leaves and arrange on a serving platter. Serve with sticky rice or steamed white rice if desired.


Grilled Romaine with Steak, Cherry Tomatoes and Parmesan

Summer in Texas can leave you at a loss when it comes to meals. A steak can sound so appetizing but the sides are just too much. Who wants a hot potato when it’s 105 degrees outside? This is one of my favorite ways to make a salad a meal.

Grilling lettuce is quite brilliant. The goal is to get a slight char on the outside leaves but the inside remains crisp and cool. Your lettuce will have more flavor than you ever thought possible… for lettuce anyway.

Being that my favorite condiment is balsamic vinegar I usually drizzle mine with the good stuff… but a cold blue cheese dressing would be over the top.

INGREDIENTS

  • 1 head of romaine lettuce
  • 1 pound flank steak
  • Cherry tomatoes (as many as you want)
  • Parmesan cheese (as much as you want)
  • Olive oil
  • Balsamic vinegar or dressing of choice
  • Salt & Pepper

DIRECTIONS

Preheat grill and set to medium flame.

Season steak with salt, pepper or your favorite seasoning (I like Montreal steak seasoning) and grill to your desired doneness. Set aside to rest before slicing.

While steak is resting, cut the romaine lettuce in half lengthwise and drizzle with olive oil, salt and pepper. Grill for a few minutes per side – just long enough to get some char on the outside leaves.

Arrange lettuce on a large platter and top with steak slices, tomatoes and shavings of parmesan cheese. Top with balsamic vinegar or your dressing of choice.


Grilled Salmon with Maple-Chipotle Glaze

This meal has been in my head since the Maple Chipotle Corn went in my mouth. It was more delicious than I had imagined and is a perfect balance of sweet and spicy that brings a new life to salmon.

I never attempt to flip fish on an outdoor grill… it just never works out for me. So I forget the showpiece grill lines and take the chance my fish will stay in one piece. Simply close the lid and let it cook skin side down and you will have a perfect piece of salmon.

INGREDIENTS

  • 1/4 cup pure maple syrup
  • 2 tablespoons butter
  • 1 garlic cloves, minced
  • 2 teaspoons minced canned chipotle chilies in adobo
  • 1/8 teaspoon salt
  • 1 pound salmon, skin on

DIRECTIONS

Bring first 5 ingredients to simmer in heavy small saucepan over medium heat. Reduce heat to low and simmer until glaze is reduced to 3/4 cup, stirring occasionally, about 10 minutes. (Glaze can be made 1 day ahead. Cover and refrigerate.)

Season the salmon with salt and pepper. Rub some olive oil on the skin to keep it from sticking.

Preheat grill (I prefer outdoor gas grill) over medium heat. When grill is hot reduce flame to medium-low and place salmon on the grill skin side down. Baste salmon with the glaze several times throughout grilling (closing the lid for 2-3 minute intervals). Do not flip the salmon! It will cook through in 8 -10 minutes, depending on the thickness of the fish.

Chocolate Crackle Cookies

These cookies are dead simple and the ingredients are probably already in your pantry. Yes, I always have Valrhona cocoa powder in my pantry – who doesn’t???

The egg whites do not have to be whipped into a froth – just lightly beat with a fork. You can use any combination of nuts and substitute cocoa nibs for the chocolate chips if you can find them!

The bowl is definitely worth licking.

INGREDIENTS

  • 3 cups powdered sugar
  • 2/3 cup cocoa powder (Valrhona is the best)
  • 1/2 teaspoon salt
  • 1 cup each of toasted pecans, mini chocolate chips & toasted almonds (chopped)
  • 4 large egg whites
  • 1 teaspoon vanilla extract
  • 1/4 teaspoon espresso powder

DIRECTIONS

Preheat oven to 350F. In a large bowl, mix together powdered sugar, cocoa, and salt using a whisk. Add in nuts and chocolate chips. In a small bowl, stir together the egg whites and vanilla and then pour into the nut, cocoa& sugar mixture. Give everything a good stir until everything is well combined.

Line cookie sheets with parchment or silpat and then drop batter using a tablespoon. Make sure that there is at least 2 inches between each cookie and that you have no more than 8 cookies per sheet. Bake for 13-15 minutes. You will know that they are ready when the cookies lose their shine and become matte. Use a spatula to carefully lift each cookie onto a cooling rack. Makes about 24 cookies.

Heirloom Caprese Flatbread

The high temps in Dallas have kept me out of my kitchen the past several weeks. I have been a lazy cook – creating nothing but quick and easy salads. I came across some beautiful heirloom tomatoes at the Dallas farmers market and decided a twist on an old classic – Caprese Salad – would be an honorable fate for these orange beauties. The warm oozing fresh mozzarella with the cool tomatoes is absolutely delicious… and the balsamic makes it all sing.

INGREDIENTS

  • 1 wheat pita or flatbread
  • 1 clove garlic, minced
  • 1/2 teaspoon olive oil
  • 2 ounces fresh mozzarella
  • 1 medium tomato
  • 3 large basil leaves, torn into pieces
  • 1 teaspoon aged balsamic vinegar
  • Salt

DIRECTIONS

Preheat oven to 350 degrees.

Tear mozzarella into small quarter size pieces and spread over the flatbread crust. Top with minced garlic, olive oil and salt(to taste). Bake for 15 minutes until flat bread is crispy and cheese is melted. Remove from oven and top with sliced tomatoes and basil. Season the tomatoes with a little more salt and drizzle with balsamic vinegar. Devour.

Grilled Corn on the Cob with Maple-Chipotle Glaze

I can’t imagine going back to regular corn after tasting this sweet and spicy combo. My dad has a fail proof microwave method (no dealing with pesky silks) and then I grill it afterwards to get the brown charred kernels.

I have to believe this would also be incredible slathered on salmon!

INGREDIENTS

  • 1/2 cup pure maple syrup
  • 1/4 cup (1/2 stick) butter
  • 2 garlic cloves, minced
  • 4 teaspoons minced canned chipotle chilies*
  • 1/4 teaspoon salt
  • 6 ears fresh corn (husks on for cooking)

DIRECTIONS

Bring first 5 ingredients to simmer in heavy small saucepan over medium heat. Reduce heat to low and simmer until glaze is reduced to 3/4 cup, stirring occasionally, about 10 minutes. (Glaze can be made 1 day ahead. Cover and refrigerate.)

This is my Dads quick microwave corn method – and it’s a huge success. Keep husks and silks on the corn. Cut the bottom and top off the corn. For each ear of corn, add 3 minutes to the total time. 6 ears of corn will cook a total of 18 minutes. Place corn in microwave and cook for 9 minutes. Turn corn over and cook another 9 minutes. (You can prepare the corn up to this point and wait to clean until ready to grill with the glaze). Remove the husks and silks.

Prepare barbecue (medium heat). Brush corn with some of glaze. Grill until lightly charred in spots, turning frequently. Transfer corn to platter. Brush corn with remaining glaze. Sprinkle generously with salt and serve.

Bing Cherry, Blueberry & Almond Crumble

Sadly, fresh cherries have not been in my life before this summer. Maybe in the back of my mind I knew pitting the suckers would suck. It only sucked for a short bit until I found the perfect pitting tool: the metal pour spout from my olive oil bottle. Works like a charm.

I probably ate a 1/4 pound fresh out of the bowl and they were delicious. But the fresh cherry and caramelized onion compote over pork chops wasn’t too shabby either! I will be making that again in the next few weeks to share with you.

Lets move on to dessert. Those of you who know me can testify that the ice cream in my freezer usually gets thrown out. My sweet tooth isn’t as big as my chip and dip tooth. But when it comes to crumbles, crisps, cobblers, hot fruit and sweet brown sugar crusts… hand me the spoon and an ice cream scoop. Pronto.

I’ve made a few versions with my cherry crop – but this is my favorite. Luckily it is lighter in calories and fat which means I don’t have to give it all away.

Calories: 311, Fat: 11g, Protein: 4g

INGREDIENTS

Filling

  • 6 cups (about 2 pounds) bing cherries, pitted
  • 1/2 cup blueberries
  • 1/4 cup tightly packed brown sugar
  • 2 tablespoons sugar
  • 1/4 cup cornstarch
  • 1 tablespoon fresh lemon juice
  • 1/4 teaspoon almond extract
  • 1/8 teaspoon salt
  • Cooking spray

Topping

  • 1/2 cup all-purpose flour (about 2 1/4 ounces)
  • 1/2 cup old-fashioned rolled oats
  • 1/2 cup packed light brown sugar
  • 1/8 teaspoon salt
  • 6 tablespoons chilled butter, cut into small pieces
  • 1/2 cup sliced almonds

DIRECTIONS

Preheat oven to 375°.

To prepare the filling, combine cherries, 1/3 cup granulated sugar, cornstarch, juice, almond extract, and salt in a large bowl; toss gently. Spoon cherry mixture into an 11 x 7–inch baking dish coated with cooking spray.

To prepare topping, combine flour, oats, brown sugar, and 1/8 teaspoon salt in a medium bowl, stirring with a whisk. With you fingers, work in butter until mixture resembles coarse meal. Stir in sliced almonds. Sprinkle oat mixture evenly over cherry mixture. Bake at 375° for 45 minutes or until filling is bubbly and topping is crisp. Let stand 5 minutes; serve warm.

https://www.barbieinablender.org